July 25, 2019
Understanding WAD3 Files
Introduction
WAD3 files are collections of textures used by Half-Life's GoldSrc engine. The file extension of WAD3 files is ".wad", so I will use the terms "WAD" and "WAD3" interchangebly. I recently finished writing an online WAD editor and part what made it such a difficult task was that there seemed to be no authoritative description of the WAD3 file format specification. The specifications I did find were either incorrect approximations, or too vague and imcomplete to be of use. Fortunately, through much trial and error and cross-referencing these specifications, I was able to create a working model of the WAD file. By no means is my model authoritative, or even 100% correct. Some guesses had to be made. Thats okay because my purpose in writing this is not to be the authority on the WAD3 format, but rather to make it easier for future developers who wish to create applications using WAD files. Half-Life has been my favorite game since I first played it as a 12-year-old child, and I am happy to share any information that I have that will assist in prolonging its life.
Prerequisites
To understand this document, you should have at least a basic understanding of binary file input/output in some programming language. The language doesn't matter. I've written WAD extractors in both C++ and javascript. You also need to have an understanding of how RGB triplets are used to describe colors on a computer. Throughout this document I will be writing these triplets in the form (R, G, B).
Color Palettes
In the modern world, we have enough memory storage to be able to have arrays and arrays full of RGB triplets. This was not the case in 1998. Developers had to be more conscious of the space their data was consuming. WAD files use color palettes, also called color tables, to compress the texture images. This came at a cost of degraded image quality, but the quality was more than sufficient at the time. Even now, I don't think I've ever noticed the degradation unless I was specifically comparing it side-by-side with the original image. Color palettes work by blending similar colors into a single color to reduce the total number of colors in the image.
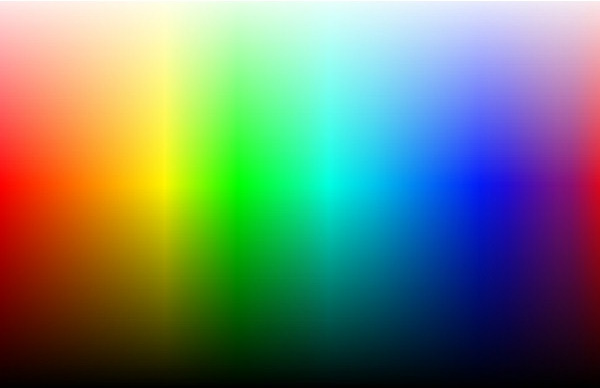
 This image was compressed to a 256 color palette (Note that his is the palette does not provide an accurate approximation of the original image because it has to cover the entire color spectrum. This is not an issue for most images.)
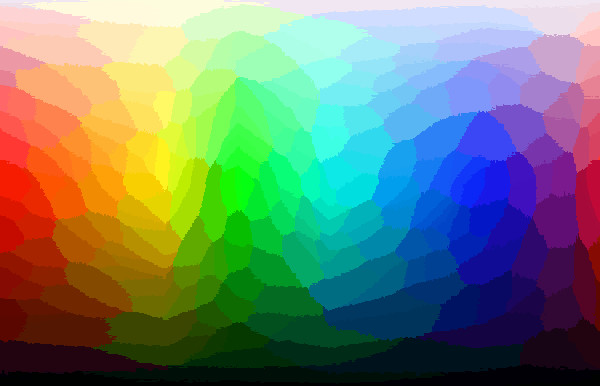
 This image is also compressed to 256 colors, but here the palette is able to perform a much closer approximation.
Once the the number of colors is reduced, a list is created of all of the remaining colors, with no repeats. This is called the palette, or color table. So rather than storing the image as a series of (R, G, B) values, which takes up 3 bytes, the image is stored as an array of references into the palette. In the WAD3 format, the maximum palette size is 256, so a reference to the palette only requires a single byte. So now instead of describing an image with a series of 3 byte triplets, we describe it using 1 byte references, plus the color table which is 256 * 3 bytes in size.
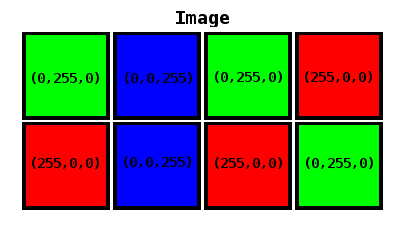 This is an image consiting of an array of RGB values. It consists of 8 pixels, 3 bytes per pixel for a total of 24 bytes.
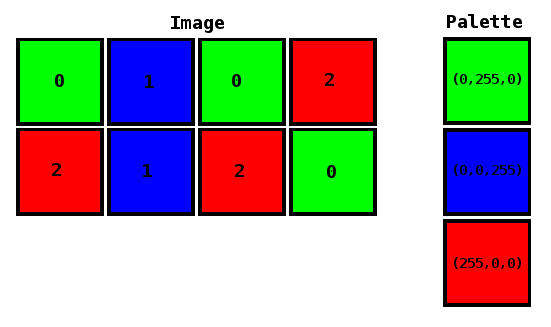 This is the same image using a palette. It consists of 8 pixels (stored as 1-byte palette references) and a palette of 3 colors (3 bytes per color) for a total of 17 bytes.
Here is a quick look at how I built a palette generator
This is the same image using a palette. It consists of 8 pixels (stored as 1-byte palette references) and a palette of 3 colors (3 bytes per color) for a total of 17 bytes.
Here is a quick look at how I built a palette generator
Mipmaps
Mipmaps are a series of precalculated textures of decreasing size. They start with a base texure image and decrease it by a power of two for each iteration depending on how many mip levels the mipmap has.
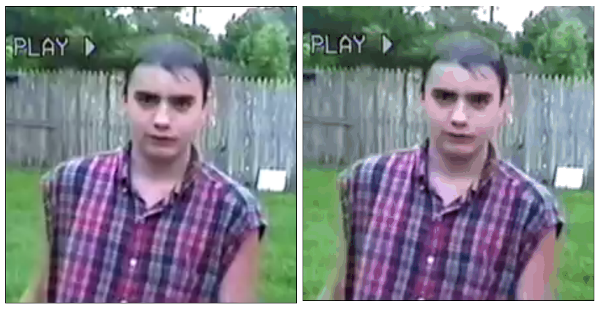
 A mipmap as seen in the WAD-editing program Wally
As a texture gets farther away from the viewer, the renderer will use lower level mipmaps to reduce aliasing effects. Without a mipmap, the texture will appear increasingly pixelated at a distance. Mipmaps are essentially a method of preblurring the images to give them a more natural appearance at a distance.
 This shows how the texture would be rendered with increasing distance from a viewer by using only a base texture with no mipmap. Notice how jagged and pixelated the farther textures appear.
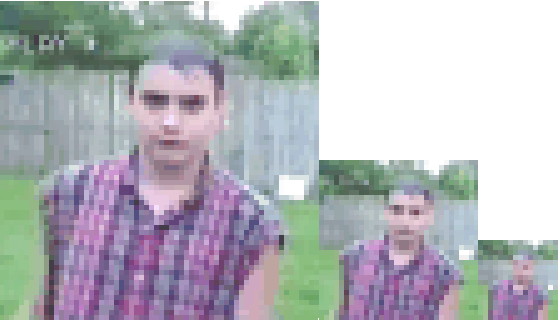 Here, mipmaps are used to pre-blur the images so they have a more natural look at an increasing distance.
File Specification
| General Layout |
| File Header | Texture File | Texture File | Texture File | ... | Directory Entry | Directory Entry | Directory Entry | ... |
In this section we're going to explore how the data is actually laid out in the WAD file. The file starts with a header that has information for a general overview of the file. This is followed by the actual texture files. Somewhat counterintuitively, the directory entries are located after the texture data at the end of the file. The directory entries are like the table of contents of the file. It gives information about each texture and where in the file the actual texture data can be found. We're going to break these sections down further and describe them byte-by-byte.
Header
| Header (12 bytes) |
| Bytes | Name | Description |
| 4 | szMagic | "WAD3" |
| 4 | nDir | (The number of directory entries) |
| 4 | nDirOffset | Offset into file where entries start |
At the beginning of the file we have the header. The first four bytes make up magicStr, the magic string. Magic strings are used to verify correct file formats. For example, a WAD editor will check for this string when asked to open a WAD file. If the correct string is not found, it will throw an error message. The magic string here is "WAD3" as ASCII characters.
The next four bytes make up nDir, the number of directory entries. This is simply the number of textures stored within the WAD file. For every texture, there is a directory entry. Following this is the nDirOffset, the offset to the beginning of the directory entries in the file. The offset is how many bytes from the start of the file to get to the entry directory section within the file.
Directory Entries
| Directory Entry (32 bytes) |
| Bytes | Name | Description |
| 4 | nFilePos | Absolute offset to file's location |
| 4 | nDiskSize | Size of the file |
| 4 | nSize | Uncompressed size |
| 1 | nType | Type of entry |
| 1 | bCompression | 0 if not compressed |
| 2 | padding | Unused |
| 16 | szName | Name of file (null terminated) |
The WADs structure hearkens back to the days of Doom when WADS were used to hold all types of game data. For the puposes of the Goldsrc engine, WAD3's are merely used to hold textures and sprites, but the historical structure remains. This is why directory entries refer to "files" instead of "textures". For our purposes, you can consider a "file" to be a texture or a sprite.
The Directory Entry structure starts off with a 4 byte offset to the beginning of the file's (texture or sprite's) position within the WAD. The offset is measured from the beginning of the WAD file. Next, nDiskSize gives the size of the file as it currently exists within the WAD. Following this is nSize which is what the size of the file would be if it were uncompressed. I've never seen compression used in a Goldsrc game so it's safe to say we can ignore that feature.
Next up we have nType which is a number defining the file type. The only type I've used is textures, which are type 0x43. There are other type codes, as well. I have not used them but will include my best guess as to what they are from referencing Yuraj's WAD3 Specification which I found very useful. Following this, we have bCompression which indicates whether or not the file is compressed. For our purposes, this will always be zero. The next to bytes are unused padding followed by a 16 byte null terminated string, szName, that gives the file name.
Texture Files
| Texture File Layout |
| Texture Header | ... | MIP-Level 0 Pixels | MIP-Level 1 Pixels | MIP-Level 2 Pixels | MIP-Level 3 Pixels | Padding (2 bytes) | Palette | Padding (2 bytes) |
The texture files consists of a header followed by the pixel data of the 4 MIP levels and finally the 256 byte palette.
| Texture Header (40 bytes) |
| Bytes | Name | Description |
| 16 | szName | Texture name (null-terminated) |
| 4 | nWidth | Texture width in pixels |
| 4 | nHeight | Texture height in pixels |
| 4 | MIP-offset 0 | relative offset to level 0 MIP pixels |
| 4 | MIP-offset 1 | relative offset to level 1 MIP pixels |
| 4 | MIP-offset 2 | relative offset to level 2 MIP pixels |
| 4 | MIP-offset 3 | relative offset to level 3 MIP pixels |
The header starts with a 16 byte null-terminated string for the texture name. In Goldsrc, texture names can be prefixed with a special symbol to give it certain behaiviors.
| Texture Name Prefixes |
| Symbol | Type |
| { | Transparent |
| ! | Water/Fluid |
| + | Toggling |
| - | Random Tiling |
| ~ | Light-emitting surface |
Next is nWidth and nHeight which give the width and height of the texture in pixels. Following this are four relative offsets to the MIP-level pixels. The offset here is relative to the beginning of the texture header. To put it simply, the MIP-level 0 offset gives the amount of bytes from the beginning of the textures header to get to the base-texture's pixel area. MIP-level 0 is the base texture. MIP-level 1 is the texture half that size. MIP-level 2 is the texture half the size of MIP-level 1 and so on.
The palette is located after the last MIP-level. There are 2 bytes of padding between the last MIP-level and the palette. One way to locate the palette is to use the equation:
paletteOffset = textureFileOffset + textureFileSize - (256 * 3) - 2;
In other words, the offset of the palette from the beginning of the WAD file is given by adding the texture file's offset to the texture file's size. This fast forwards us to the end of the texture file. Then we back up by 2 bytes (because the texture file ends with 2 bytes of padding). Then we backup by the palette size. The palette size is 256 * 3 (because their are 3 bytes per color).
Final Notes
I have not yet implemented support for sprites in my editor, so rather than attempt to teach something I have no experience with, I will refer you to Yuraj's WAD3 Specification. I hope you have found this helpful and please feel free to e-mail me with any questions or corrections. Good luck!